“`html
- Getting Your Grill On: Essential Ingredients
- Prepping Perfection: Setting the Stage for Success
- Mastering the Flames: How to Grill Chicken Wings to Crispy Perfection
- What Makes These Grilled Chicken Wings Stand Out?
- Serving Suggestions & Pairing Ideas
- Common Questions About Grilled Chicken Wings
- Why aren’t my grilled chicken wings crispy?
- Can I use frozen chicken wings for this recipe?
- What’s the best way to prevent flare-ups when grilling wings?
- Can I bake these wings instead of grilling?
- How do I know when the wings are fully cooked?
- Storage and Reheating Tips
- Variations & Flavor Twists
I once tried to grill chicken wings directly from the fridge, unseasoned, in a moment of sheer, unadulterated hunger. The result? Pale, rubbery, and utterly disappointing. That kitchen mishap, however, taught me a crucial lesson: great grilled chicken wings don’t happen by accident. They’re born from a little patience, a good marinade, and a passionate understanding of heat. And trust me, once you master these crispy, smoky beauties, you’ll wonder why you ever bothered with ordering takeout.
There’s something incredibly satisfying about the char of a perfectly cooked wing, the way the skin crackles and releases that unmistakable smoky aroma. Paired with the juicy, tender meat underneath, it’s a culinary experience that screams summer, good company, and effortless deliciousness. This recipe is all about achieving that magic, transforming simple ingredients into an irresistible feast.
Whether you’re firing up the grill for a casual weeknight dinner or preparing for a backyard bash, these wings are guaranteed to be a crowd-pleaser. They’re designed to be easy enough for beginners but flavorful enough to impress even the most seasoned grill master.
Let’s face it, wings are a universal love language. But not all wings are created equal. This recipe for grilled chicken wings focuses on building layers of flavor and achieving that coveted crispy exterior without drying out the meat. We’re talking about a simple yet effective dry rub that adheres beautifully to the skin, creating a delicious crust as it cooks over the flames.
The beauty of grilling is its ability to impart a unique smokiness that baking or frying simply can’t replicate. When you combine that with a strategic cooking method, you get wings that are juicy on the inside, wonderfully charred on the outside, and begging for a spot on your plate. Forget bland, watery wings – we’re going for bold, flavorful, and utterly addictive.
Getting Your Grill On: Essential Ingredients
The magic starts with quality ingredients, but don’t fret – this isn’t a long, intimidating list. We’re focusing on maximum flavor with minimal fuss. The proportions here are for about 2 pounds of wings, which typically serves 3-4 people as a main course or 6-8 as an appetizer, depending on how hungry everyone is!
For the Wings:
- 2 lbs chicken wings (flats and drumettes, separated)
- 1 tbsp olive oil (or avocado oil)
The All-Star Dry Rub:
- 1 tbsp smoked paprika (essential for that deep, smoky flavor!)
- 1 tsp garlic powder
- 1 tsp onion powder
- 1/2 tsp cayenne pepper (adjust to your spice preference – omit for mild)
- 1 tsp dried oregano
- 1/2 tsp black pepper, freshly ground
- 1 tsp sea salt (or kosher salt)
- 1/2 tsp brown sugar (lightly packed, helps with caramelization)
Prepping Perfection: Setting the Stage for Success
Before those wings even hit the grill, a little preparation goes a long way. This isn’t just about seasoning; it’s about ensuring every wing cooks evenly and absorbs all that delicious flavor.
Wing Prep:
- Pat ‘Em Dry: The absolute first step is non-negotiable. Use paper towels to thoroughly pat the chicken wings dry. Like, really dry. This is crucial for achieving crispy skin. Moisture is the enemy of crispiness!
- Toss with Oil: In a large bowl, drizzle the dried wings with olive oil. Toss them well to ensure each wing is lightly coated. This helps the dry rub adhere better and promotes even browning.
- Apply the Rub: In a small bowl, combine all the dry rub ingredients: smoked paprika, garlic powder, onion powder, cayenne pepper, dried oregano, black pepper, sea salt, and brown sugar. Mix them together until well combined.
- Season Generously: Sprinkle the dry rub over the oiled wings in the large bowl. Use your hands to toss and massage the rub into every nook and cranny of the wings. Don’t be shy – you want them fully coated.
- Marinate (Optional, but Recommended): For best results and deeper flavor, cover the bowl and refrigerate the seasoned wings for at least 30 minutes, or even better, 2-4 hours. You can even do this overnight! If refrigerating, let them sit at room temperature for about 15-20 minutes before grilling.
Mastering the Flames: How to Grill Chicken Wings to Crispy Perfection
Grilling wings is more art than science, but with a few key techniques, you’ll be turning out restaurant-quality wings every time. We’re aiming for that beautiful balance of smoky char and succulent meat.
Grill Setup:
- Preheat the Grill: Preheat your gas grill to medium-high heat (around 400-425°F / 200-220°C). If using a charcoal grill, arrange the coals for a two-zone cooking method: one side hot and direct, the other side cooler and indirect.
- Clean and Oil Grates: Once hot, use a wire brush to clean the grill grates thoroughly. Then, lightly oil the grates by dipping a paper towel in a little oil and carefully wiping it over the hot grates with tongs. This prevents sticking.
The Grilling Process:
- Initial Sear (Direct Heat): Place the seasoned chicken wings directly over the medium-high heat. Close the lid and cook for about 2-3 minutes per side. You’re looking for a good sear and some initial char marks. Don’t overcrowd the grill! Cook in batches if necessary.
- Move to Indirect Heat: Once you have a nice sear, move the wings to the cooler side of the grill (indirect heat) or reduce your gas grill burners to medium-low (around 325-350°F / 160-175°C).
- Slow Cook & Rotate: Close the lid and continue to cook the wings, turning them every 5-7 minutes. This slower cooking process allows the fat to render, the skin to crisp up, and the meat to cook through without burning.
Tip: Keep a spray bottle of water handy. If you get any flare-ups from dripping fat, a quick spritz will calm the flames without washing off your seasoning.
- Check for Doneness: The wings are done when they are deeply golden brown, crispy, and the internal temperature reaches 175°F (80°C) with an instant-read thermometer. This usually takes about 25-35 minutes total, depending on your grill and wing size. The higher temperature (175°F instead of 165°F for chicken breast) ensures the collagen breaks down, making the meat extra tender and falling off the bone.
- Final Crisp (Optional): If your wings aren’t as crispy as you’d like at the end, you can move them back over direct high heat for 1-2 minutes per side, watching them carefully to prevent burning.
- Rest & Serve: Transfer the grilled chicken wings to a clean platter. Let them rest for 5 minutes before serving. This allows the juices to redistribute, leading to even more tender results.
What Makes These Grilled Chicken Wings Stand Out?
It’s all about method and ingredients. Many wing recipes either bake them (which lacks that smoky char) or deep-fry them (delicious, but messy and less healthy). Grilling offers the best of both worlds: that incredible smoky depth and a wonderfully crispy skin without all the added oil.
The combination of smoked paprika and a touch of brown sugar in our dry rub is key. Smoked paprika brings an earthy, deep flavor that enhances the natural smokiness from the grill. The brown sugar helps with caramelization, creating those beautiful charred bits that are packed with flavor, while also balancing the savory spices.
The two-zone cooking method (or adjusting direct heat) is also a game-changer. Starting with a direct sear locks in juices and creates initial browning, then moving to indirect heat allows the wings to cook through gently, rendering the fat slowly and achieving that perfect crispy skin without burning the outside.
Serving Suggestions & Pairing Ideas
These smoky, crispy grilled chicken wings are incredibly versatile. They shine on their own, but a few complementary sides can really complete the meal. Think about things that offer a contrasting texture or a cooling element.
- Cool & Creamy Dips: A classic blue cheese dressing or a simple ranch dip are always winners. A cool Greek yogurt dip with herbs would also be fantastic.
- Fresh Salads: A crisp green salad with a light vinaigrette, a creamy coleslaw, or a vibrant potato salad are perfect counterpoints to the richness of the wings.
- Roasted or Grilled Veggies: Asparagus, corn on the cob, or bell peppers tossed with a little olive oil and grilled alongside the wings would make a fantastic and healthy addition.
- Classic Sides: French fries, onion rings, or even a simple rice pilaf can round out the meal beautifully.
Common Questions About Grilled Chicken Wings
Even seasoned grillers have questions, and wings can sometimes be tricky! Here are some common queries I get.
Why aren’t my grilled chicken wings crispy?
The most common culprit is moisture. Make sure you pat the wings thoroughly dry before seasoning them. Also, ensure your grill isn’t too low; you need enough heat to render the fat and crisp the skin. Don’t overcrowd the grill, as this lowers the temperature and creates steam, preventing crispiness.
Can I use frozen chicken wings for this recipe?
Yes, but you absolutely *must* thaw them completely first. Once thawed, pat them very dry before proceeding with the recipe. Trying to grill frozen or partially frozen wings will result in uneven cooking and rubbery texture.
What’s the best way to prevent flare-ups when grilling wings?
Flare-ups are usually caused by fat dripping onto hot coals or burner flames. Using a two-zone cooking method helps, as you can move the wings to indirect heat after searing. Also, trimming any excess fat from the wings before seasoning can help. Keep a spray bottle of water nearby to quickly extinguish any flames.
Can I bake these wings instead of grilling?
You can, but they won’t have that signature smoky flavor. To bake, preheat your oven to 400°F (200°C). Place the seasoned wings on a wire rack set over a baking sheet (this helps with air circulation for crispiness). Bake for 40-50 minutes, flipping halfway, until golden brown and cooked through.
How do I know when the wings are fully cooked?
The best way is to use an instant-read meat thermometer. Insert it into the thickest part of a wing, avoiding the bone. The internal temperature should register 175°F (80°C). Visually, they should be deeply golden brown, and the meat near the bone should no longer be pink.
Storage and Reheating Tips
Leftover grilled chicken wings are a rare commodity in my house, but if you do find yourself with a few extra, they store and reheat quite well.
Pop any remaining wings into an airtight container and store them in the refrigerator for up to 3-4 days. To reheat them and restore some of that lovely crispness, I recommend avoiding the microwave. Instead, preheat an oven or air fryer to 350°F (175°C).
For the oven, spread the wings out on a baking sheet and heat for about 10-15 minutes, or until warmed through and crispy. In an air fryer, they’ll likely take 5-8 minutes, shaking the basket halfway. This method will bring back some of that satisfying crunch!
Variations & Flavor Twists
While this dry rub is fantastic on its own, don’t be afraid to experiment! Wings are a blank canvas for flavor. Here are a few ideas to get your creative juices flowing:
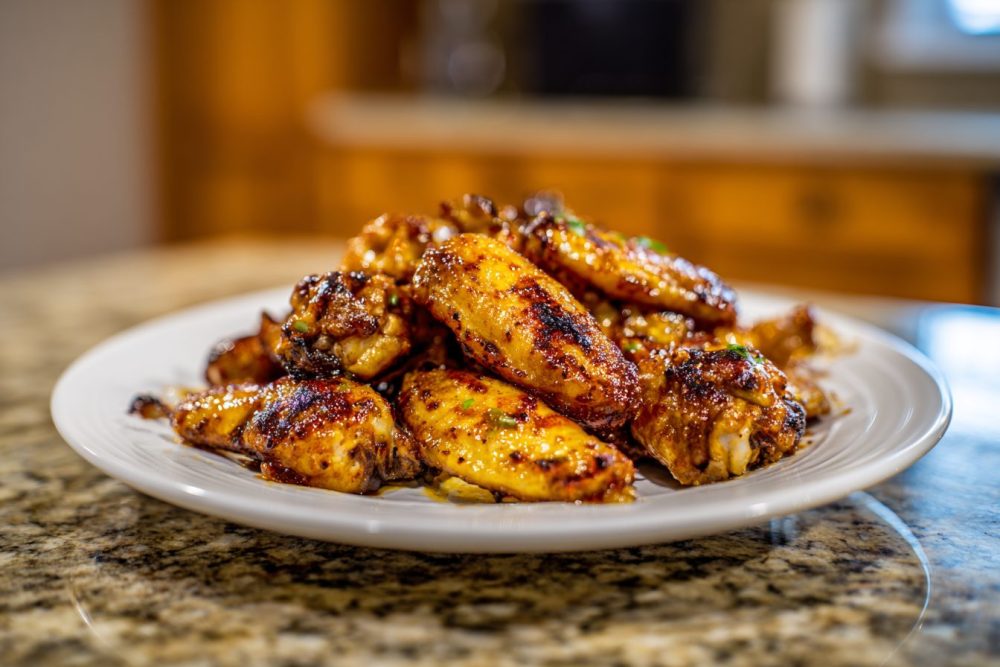
- Spicy Kick: Increase the cayenne pepper in the rub, or add a pinch of chili flakes. You could also toss the finished wings in a homemade buffalo sauce or a sriracha glaze.
- Sweet & Tangy: After grilling, brush the hot wings with your favorite BBQ sauce. A sticky honey-garlic or teriyaki glaze would also be incredible. Apply sauce in the last 5-10 minutes of grilling to prevent burning.
- Herbaceous: Add dried rosemary, thyme, or a blend of Italian herbs to the dry rub for a more aromatic profile.
- Lemon Pepper: Skip the smoked paprika and add 1 tablespoon of lemon pepper seasoning to the rub for a bright, zesty flavor.
- Garlic Parmesan: Once off the grill, toss the hot wings with melted butter, minced fresh garlic, and plenty of grated Parmesan cheese.
Each twist offers a new adventure for your taste buds, proving just how versatile and delicious grilled chicken wings can be. Don’t be afraid to make them your own!

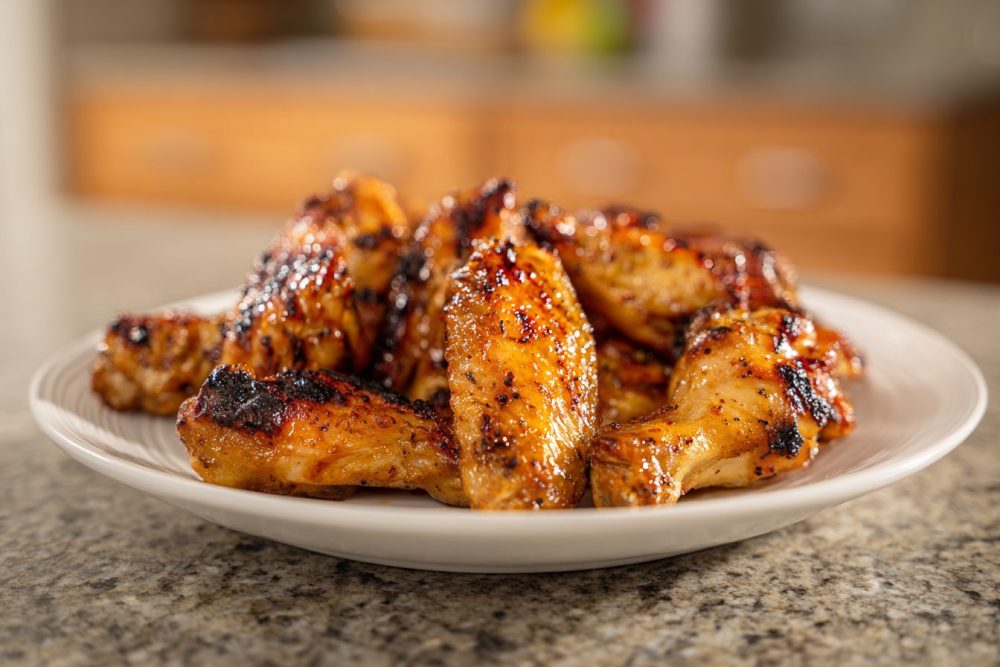
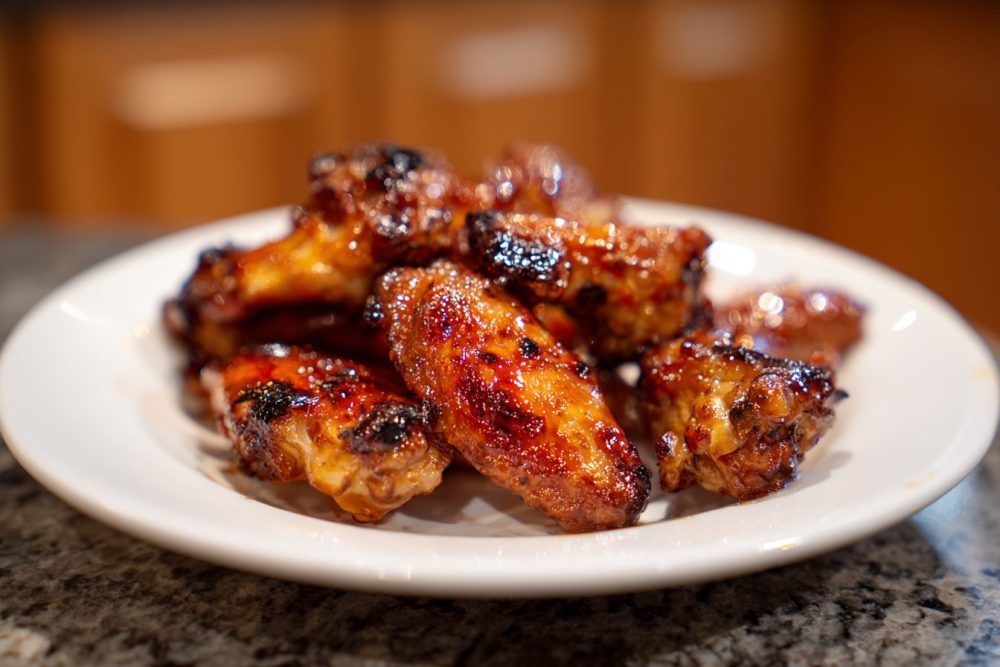
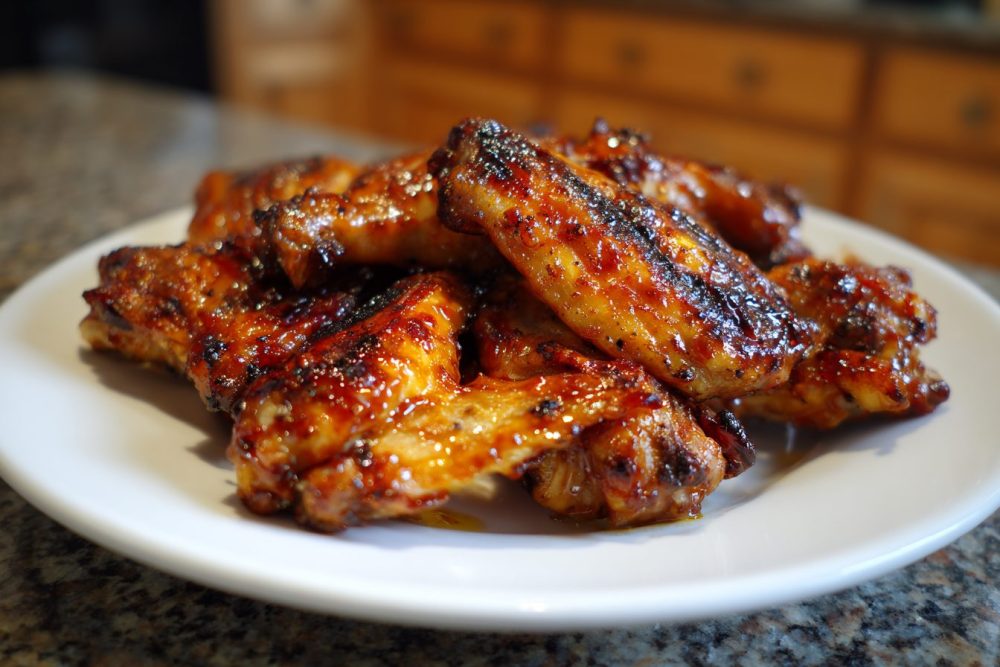
Smoky, Crispy Grilled Chicken Wings
Perfectly seasoned, smoky, and crispy grilled chicken wings. An easy recipe for your next BBQ or family dinner.
📝 Ingredients
👩🍳 Instructions
-
1Pat the chicken wings thoroughly dry with paper towels. This is crucial for crispy skin.
-
2In a large bowl, drizzle the dried wings with olive oil and toss to coat evenly.
-
3In a small bowl, combine smoked paprika, garlic powder, onion powder, cayenne pepper (if using), dried oregano, black pepper, sea salt, and brown sugar. Mix well.
-
4Sprinkle the dry rub over the oiled wings in the large bowl. Use your hands to toss and massage the rub into all the wings, ensuring they are fully coated.
-
5For best results, cover and refrigerate the seasoned wings for at least 30 minutes, or up to 4 hours, to allow flavors to meld. If refrigerated, let them sit at room temperature for 15-20 minutes before grilling.
-
6Preheat your gas grill to medium-high heat (400-425°F / 200-220°C). If using charcoal, set up for two-zone cooking with one hot side and one cooler side.
-
7Clean and lightly oil the grill grates once hot to prevent sticking.
-
8Place the seasoned wings directly over the medium-high heat. Close the lid and cook for 2-3 minutes per side to get a good sear and initial char marks. Work in batches if necessary to avoid overcrowding.
-
9Move the wings to the cooler side of the grill (indirect heat) or reduce gas grill burners to medium-low (325-350°F / 160-175°C).
-
10Close the lid and continue to cook the wings for 25-35 minutes, turning them every 5-7 minutes, until deeply golden brown, crispy, and the internal temperature reaches 175°F (80°C) when checked with an instant-read thermometer.
-
11If desired, move wings back over direct high heat for 1-2 minutes per side at the very end for extra crispiness, watching carefully to prevent burning.
-
12Transfer the grilled chicken wings to a clean platter and let them rest for 5 minutes before serving. Serve hot with your favorite dips and sides.
💡 Notes
Patting the wings very dry is the single most important step for crispy skin. Don't skip the rest period; it makes the wings juicier. For extra flavor, you can brush the finished wings with BBQ sauce during the last few minutes of grilling, or toss them in a glaze after they come off the grill.