

“`html
- Why These Egg Quesadillas Are a Morning Game-Changer
- Gathering Your Quesadilla Essentials
- From Pan to Plate: Crafting Your Cheesy Egg & Bell Pepper Quesadillas
- Step 1: The Veggie Sauté for Flavor Base
- Step 2: Scrambling the Perfect Eggs
- Step 3: Assembly Line, Quesadilla Style
- Step 4: The Golden Crisp
- Step 5: Serve and Savor
- Making Ahead and Reheating Your Breakfast Quesadillas
- Frequently Asked Questions About Breakfast Quesadillas
- Can I add meat to these quesadillas?
- What other vegetables can I use?
- What kind of tortillas are best?
- How do I prevent soggy quesadillas?
- Can I freeze these breakfast quesadillas?
- Spicy Kicks and Herbaceous Twists: Quesadilla Variations
- Why This Recipe Is Perfect For Students and Busy Bees
Ever had one of those mornings where you wake up with a rumbling stomach, craving something substantial and savory, but the thought of a multi-pan breakfast spread just sends you right back under the covers? Yeah, me too. That’s exactly how these delightful breakfast quesadillas came to be. I was tired of sad cereal or bland toast, and I wanted a quick, satisfying meal that felt a little indulgent but was actually packed with good stuff. Enter the breakfast quesadilla: a perfect package of fluffy scrambled eggs, sweet bell peppers, and gooey melted cheddar cheese, all embraced by a toasty tortilla.
It’s the ultimate grab-and-go breakfast for busy folks – whether you’re a teen rushing to school, a student cramming for exams, or just someone who appreciates a healthy, flavorful start without the fuss. Plus, it’s endlessly customizable, but we’ll get to those delicious variations later!
This recipe isn’t just about convenience; it’s about creating a moment of comfort and flavor when you need it most. Imagine that first bite: the slight crisp of the tortilla, the creamy eggs, the sweetness of the peppers, and that incredible cheese pull. Pure breakfast bliss, achieved in minutes.

Why These Egg Quesadillas Are a Morning Game-Changer
What makes this particular breakfast quesadilla recipe stand out from the rest? It’s all in the details, my friend. We’re not just throwing ingredients into a tortilla and hoping for the best. We’re building layers of flavor and texture that truly elevate a humble breakfast into something you’ll genuinely look forward to.
First off, the eggs. We’re going for fluffy, not rubbery. A little trick with milk or cream keeps them tender and moist, perfectly complementing the other fillings. Then there are the bell peppers – a mix of colors not just for aesthetics, but because each color brings a slightly different sweetness and a boatload of vitamins. And the cheese? We’re using sharp cheddar because its bold flavor cuts through the richness of the eggs and stands up to the peppers, creating a truly harmonious bite.
But beyond the ingredients, it’s the method. We’re cooking these quesadillas to a golden perfection, ensuring the tortilla is beautifully toasted and the cheese is gloriously melted and slightly caramelized at the edges. This isn’t just breakfast; it’s a culinary hug to start your day.
Gathering Your Quesadilla Essentials
You’ll be happy to know that the ingredient list for these savory breakfast quesadillas is short, sweet, and probably already in your fridge or pantry. Freshness is key here, especially for the bell peppers.
The Heart of the Matter: Ingredients
- Large Eggs: The star of our show, providing protein and richness.
- Milk or Cream: Just a splash to make those scrambled eggs extra fluffy.
- Butter or Olive Oil: For sautéing the veggies and crisping up the tortillas. Butter adds a richer flavor, but olive oil is great for a lighter option.
- Bell Peppers: I love a mix of red, yellow, and green for visual appeal and varied sweetness. Finely diced is the way to go.
- Onion: A little finely diced onion adds an aromatic depth that really sings with the peppers.
- Shredded Cheddar Cheese: Freshly shredded melts better than pre-shredded and has a better flavor. Sharp cheddar is my go-to.
- Flour Tortillas: Medium to large size (8-10 inches) works best for a good filling-to-tortilla ratio.
- Salt and Black Pepper: To season everything perfectly.
- Optional Garnishes: A dollop of sour cream, a sprinkle of fresh cilantro, a dash of hot sauce, or a side of salsa for dipping.
From Pan to Plate: Crafting Your Cheesy Egg & Bell Pepper Quesadillas
This is where the magic happens! Don’t be intimidated; this process is super straightforward and comes together surprisingly fast. Speed is of the essence when you’re hungry.
Step 1: The Veggie Sauté for Flavor Base
Get a medium non-stick skillet heating over medium heat. Add a tablespoon of butter or olive oil. Once hot, toss in your finely diced bell peppers and onion. Sauté them for about 5-7 minutes, until they’re softened and slightly tender-crisp. You want them to retain a little bite but lose their raw edge. Season with a pinch of salt and pepper as they cook. Transfer the cooked veggies to a bowl and set aside.
Step 2: Scrambling the Perfect Eggs
In a medium bowl, whisk together the eggs with a splash of milk or cream, and a good pinch of salt and black pepper. Use the same skillet (no need to clean it if you’re quick!) and add another teaspoon of butter if needed. Pour in the egg mixture. As the edges begin to set, gently push the cooked egg toward the center, tilting the pan to allow uncooked egg to flow underneath. Continue this for 2-3 minutes until the eggs are mostly set but still slightly moist. Don’t overcook them!
Note: Overcooked eggs are dry and sad. Pull them from the heat when they’re still a tiny bit glossy; they’ll finish cooking from residual heat.

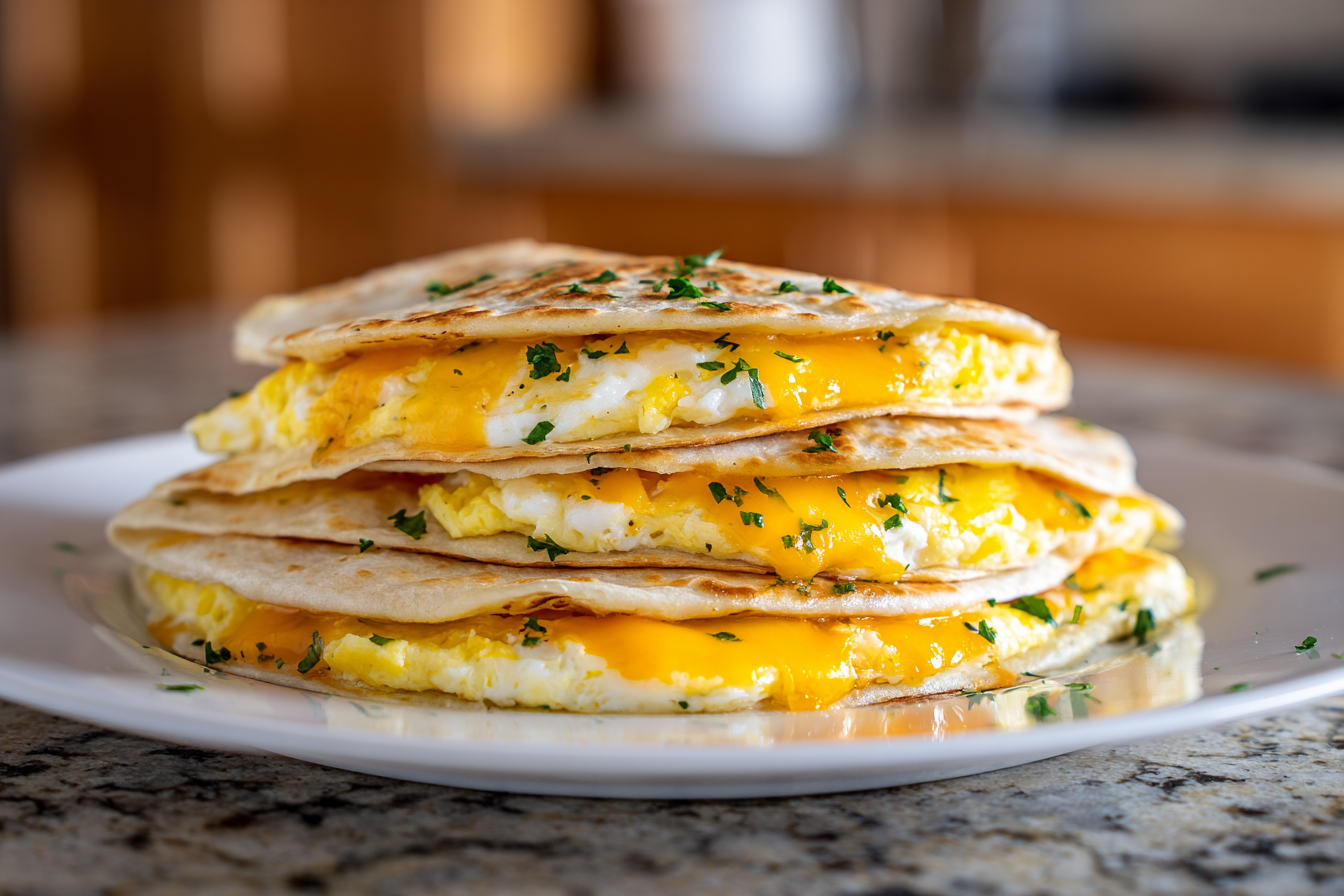
Step 3: Assembly Line, Quesadilla Style
Wipe out your skillet if needed, then place it back on medium-low heat. Lay one tortilla flat in the pan. Sprinkle about a quarter of your shredded cheddar cheese over one half of the tortilla. Spoon a quarter of the scrambled eggs over the cheese, then top with a quarter of the sautéed bell peppers and onions. Add a final sprinkle of cheese over the filling.
Step 4: The Golden Crisp
Fold the empty half of the tortilla over the filled half, gently pressing down with a spatula. Cook for 3-4 minutes per side, or until the tortilla is golden brown and crispy, and the cheese is beautifully melted and gooey. Flip carefully! Repeat with the remaining tortillas and filling.
Tip: If you’re making multiple quesadillas and your skillet size allows, you can cook two at a time to speed things up. Just make sure not to overcrowd the pan, which can lower the temperature and prevent proper browning.
Step 5: Serve and Savor
Once cooked, transfer each quesadilla to a cutting board. Let it rest for a minute, then slice it into wedges. Serve immediately with your favorite toppings like salsa, sour cream, or a sprinkle of fresh cilantro. Enjoy that warm, cheesy, egg-filled goodness!
Making Ahead and Reheating Your Breakfast Quesadillas
Life can be hectic, and having delicious options ready to go is a lifesaver. These cheesy egg and bell pepper quesadillas are fantastic for meal prep! You can cook the entire batch, let them cool, and store them for quick breakfasts throughout the week.
Storage Tips
After cooking, let the quesadillas cool completely on a wire rack. This prevents them from getting soggy from trapped steam. Once cool, wrap each quesadilla individually in parchment paper or foil, then place them in an airtight container or freezer bag. They’ll keep in the refrigerator for up to 3-4 days.
Reheating Suggestions
- Skillet Method (Best for crispness): Place the cold quesadilla in a dry, non-stick skillet over medium-low heat. Cook for 3-5 minutes per side, until heated through and crispy again.
- Oven Method (Good for multiple): Preheat your oven to 350°F (175°C). Place quesadillas on a baking sheet and heat for 8-10 minutes, or until warm and the cheese is re-melted.
- Microwave Method (Quickest, but less crispy): For the fastest reheat, pop it in the microwave for 30-60 seconds, or until heated through. The tortilla won’t be as crispy, but it’s perfect in a pinch.
Frequently Asked Questions About Breakfast Quesadillas
You’ve got questions, I’ve got answers! Let’s tackle some common queries about these breakfast quesadillas.
Can I add meat to these quesadillas?
Absolutely! Cooked and crumbled breakfast sausage, diced ham, or crispy bacon bits are all fantastic additions. Just add them in with the bell peppers and onions, or layer them with the eggs before folding.
What other vegetables can I use?
Feel free to get creative! Spinach, mushrooms, finely diced zucchini, or even roasted sweet potato cubes would be delicious. Just make sure any added veggies are cooked and excess moisture removed before adding them to the quesadilla.
What kind of tortillas are best?
Flour tortillas are generally preferred for quesadillas because they crisp up nicely and are pliable. Corn tortillas can work, but they tend to be a bit more fragile and might break when folding if not warmed first. Medium (8-inch) to large (10-inch) tortillas are ideal for holding enough filling.
How do I prevent soggy quesadillas?
The key is to cook your vegetables until they’re tender and any excess water has evaporated. Also, ensure your scrambled eggs aren’t overly wet. Don’t overfill the quesadilla, and cook each side long enough to get a good crisp on the tortilla. Allowing them to cool on a wire rack if storing also helps.
Can I freeze these breakfast quesadillas?
Yes, you can! Cook and cool them completely, then wrap each quesadilla tightly in plastic wrap and then aluminum foil. Place them in a freezer-safe bag. They’ll keep for up to 1-2 months. Reheat from frozen in an oven at 375°F (190°C) for about 15-20 minutes, or until hot and crispy.
Spicy Kicks and Herbaceous Twists: Quesadilla Variations
The beauty of a simple recipe like this is how easily it can be adapted to suit your mood or what you have on hand. Don’t be afraid to experiment!
Southwestern Fiesta
Add a pinch of chili powder or smoked paprika to your bell peppers while they sauté. Stir in a tablespoon or two of black beans and corn (drained and rinsed) with the eggs. Finish with a dollop of guacamole or a sprinkle of cotija cheese.
Herby and Fresh
Mix finely chopped fresh chives, parsley, or dill into your scrambled eggs. This adds a wonderful aromatic lift. A combination of Monterey Jack and cheddar cheese would also be lovely here.
Spinach and Feta: Mediterranean Vibe
Sauté a handful of fresh spinach with your bell peppers until wilted. Crumble in some feta cheese with the cheddar for a tangy, salty kick. A squeeze of lemon juice after cooking brightens everything up.
Hot Sauce Lover’s Dream
If you like a little heat, add a dash of your favorite hot sauce to the eggs before scrambling, or drizzle it generously over the finished quesadilla. You could also finely chop a jalapeño and sauté it with the bell peppers for a spicy kick from within!
These simple adjustments can transform your breakfast quesadillas into an entirely new experience. So go ahead, raid your fridge, and see what delicious combinations you can create!
Why This Recipe Is Perfect For Students and Busy Bees
I distinctly remember my university days – a constant battle between wanting to eat something nutritious and delicious, and the crushing reality of limited time, budget, and kitchen access. This breakfast quesadilla recipe hits all the right notes for that lifestyle. It’s incredibly budget-friendly, using staple ingredients that won’t break the bank.
The cooking process is quick, requiring minimal equipment: essentially one pan and a mixing bowl. This means less cleanup, which is always a win when you’re short on time. Plus, its versatility allows you to use up whatever leftover veggies or bits of meat you might have lingering in the fridge, reducing food waste.
Beyond that, it’s a genuinely healthy option. You’re getting a good dose of protein from the eggs, vitamins and fiber from the bell peppers, and calcium from the cheese. It’s a balanced meal that provides sustained energy, helping you power through lectures or a busy workday without that mid-morning crash. Forget instant noodles – these egg and cheese quesadillas are the real fast food for a healthy mind and body.

Cheesy Egg & Bell Pepper Breakfast Quesadillas
Quick, delicious breakfast quesadillas with fluffy eggs, sweet bell peppers, and melted cheddar—perfect for a healthy, satisfying start to busy days.
📝 Ingredients
👩🍳 Instructions
-
1In a medium bowl, whisk together the eggs, milk or cream, a pinch of salt, and a generous grind of black pepper until well combined.
-
2Heat 1 tablespoon of butter or olive oil in a large non-stick skillet over medium heat. Add the finely diced onion and bell peppers. Sauté for 5-7 minutes, stirring occasionally, until the vegetables are softened and slightly tender-crisp. Transfer the cooked vegetables to a clean bowl and set aside.
-
3Using the same skillet (add another teaspoon of butter or oil if needed), pour in the whisked egg mixture. As the edges begin to set, gently push the cooked egg toward the center, tilting the pan to allow uncooked egg to flow underneath. Continue cooking for 2-3 minutes, until the eggs are mostly set but still slightly moist. Do not overcook. Remove from heat.
-
4Wipe out the skillet if necessary. Place it back on medium-low heat. Lay one flour tortilla flat in the pan. Sprinkle about 1/4 cup of cheddar cheese over one half of the tortilla.
-
5Spoon about 1/4 of the scrambled eggs over the cheese, then top with 1/4 of the sautéed bell peppers and onions. Add a final sprinkle of about 1/4 cup of cheese over the filling.
-
6Fold the empty half of the tortilla over the filled half, gently pressing down with a spatula. Cook for 3-4 minutes per side, or until the tortilla is golden brown and crispy, and the cheese is beautifully melted and gooey. Carefully flip to cook the other side.
-
7Transfer the cooked quesadilla to a cutting board. Let it rest for a minute, then slice into wedges. Repeat steps 4-6 with the remaining tortillas and filling.
-
8Serve immediately with your choice of salsa, sour cream, hot sauce, or fresh cilantro.
💡 Notes
For best results, use freshly shredded cheese as it melts more smoothly. Feel free to customize with other cooked meats like ham or bacon, or extra veggies like spinach or mushrooms. Leftovers can be stored in the refrigerator for 3-4 days and reheated in a skillet or oven for best crispness.


