

Ever wake up with a serious sweet tooth but know a regular stack of syrupy pancakes just won’t cut it for keeping you fueled and focused? I’ve been there countless times, staring into the fridge, wanting something comforting, sweet, and satisfying, but also needing a significant protein punch to start the day right. That very dilemma led me down a delicious path to perfecting these fluffy baked protein pancake bowls, and honestly, they’ve become an absolute staple in my kitchen.
- Why Bowl-Baking is Brilliant for Protein Pancakes
- The Secret to Their Incredible Fluffiness
- Gathering Your Ingredients for Perfect Protein Pancakes
- Crafting Your High-Protein Breakfast Bowls
- Prep Your Oven & Bowls
- Whisk the Dry Ingredients
- Combine the Wet Ingredients
- Bring it All Together
- Bake to Fluffy Perfection
- Serving and Savoring Your Protein-Packed Treat
- Meal Prep and Storage Made Easy
- Common Questions About These Baked Pancakes
These aren’t your traditional skillet pancakes that require flipping and a mountain of butter. Instead, we’re baking them in a bowl, which means minimal effort, easy cleanup, and a perfect single-serving portion every single time. It’s a fantastic solution for healthy sweets cravings, especially when you’re aiming for a high-protein breakfast that doesn’t skimp on flavor or texture. I promise, the ‘baked’ part just makes them even more irresistible.
Whether you’re meal prepping for a busy week ahead or simply craving a cozy weekend treat, these protein-packed bowls deliver. They’re soft, incredibly fluffy, and hold up beautifully, making them a true game-changer for anyone looking to simplify their morning routine without sacrificing nutrition or taste. Get ready to fall in love with your new favorite breakfast sensation!

Why Bowl-Baking is Brilliant for Protein Pancakes
Let’s be real, traditional pancakes can be a bit of a faff. Standing over a hot griddle, waiting for bubbles, the perfect flip… it’s a labor of love, but sometimes, love is just too much effort before your first cup of coffee. That’s where the magic of the baked protein pancake bowl comes in. It’s a hands-off approach that yields incredibly consistent results, every single time.
The oven provides a gentle, even heat that allows the batter to puff up beautifully, creating a uniform fluffiness that’s hard to achieve on a stovetop. Plus, no more battling with unevenly cooked centers or burnt edges. Just pour, bake, and enjoy. This method also means you can easily make several at once for meal prep, something that’s much trickier with individual skillet pancakes.
Beyond the convenience, baking creates a slightly different texture – it’s more like a soufflé or a perfectly tender cake, with a golden crust on top and a soft, airy interior. This isn’t just about ease; it’s about elevating your breakfast experience to something a little more special, a little more decadent, without adding any extra work.
The Secret to Their Incredible Fluffiness
You might be wondering how these baked protein pancake bowls manage to be so light and airy despite being packed with protein. It’s a combination of a few key ingredients and techniques that ensure every bite is wonderfully tender. Firstly, using a good quality whey protein powder is crucial. Not all protein powders are created equal, and some can lead to a dense, gummy texture. I’ve found that a whey protein blend or an unflavored isolate works best here, but a good plant-based protein can also work if it’s finely milled.
Another important factor is the leavening. A careful balance of baking powder and baking soda reacts with the acidic ingredients (like buttermilk, or a dairy-free alternative like almond milk with a splash of vinegar) to create those lovely air pockets. Don’t skimp on these!
Finally, and perhaps most importantly, is not to overmix the batter. A few lumps are perfectly fine. Overmixing develops the gluten in the flour, leading to a tougher texture. We want just enough mixing to combine the ingredients, and then let the oven do the rest of the work. This gentle handling ensures that the final result is always soft and delicate, exactly what you want from high-protein pancakes.
Gathering Your Ingredients for Perfect Protein Pancakes
One of the best things about this recipe is that it uses pantry staples you likely already have on hand. No obscure ingredients needed, just simple, wholesome components that come together to create something truly delicious and nutritious.
Pancake Bowl Essentials
- All-Purpose Flour or Whole Wheat Flour: I often use a 50/50 mix for a little extra fiber without sacrificing too much fluffiness. Gluten-free flour blends work too!
- Protein Powder: As mentioned, a good quality whey or plant-based protein is key here. Vanilla flavored is great, or unflavored if you want to control the sweetness and flavor profile.
- Baking Powder & Baking Soda: The dynamic duo for ultimate lift. Make sure yours isn’t expired!
- Sweetener: Maple syrup, honey, or a sugar substitute like erythritol or stevia. Adjust to your preference.
- Milk: Any milk will do – dairy, almond, oat, soy. I love the slight tang of buttermilk for a tender crumb, but regular milk with a teaspoon of vinegar or lemon juice stirred in works just as well.
- Egg: For binding and richness.
- Vanilla Extract: Essential for that classic pancake flavor.
- A Pinch of Salt: Balances the sweetness and enhances all the other flavors.
Toppings & Embellishments
This is where you can really get creative! While the baked protein pancake is fantastic on its own, toppings elevate it to a dessert-like breakfast. Fresh berries are a must for me – blueberries, raspberries, or sliced strawberries add a burst of freshness and antioxidants. A drizzle of extra maple syrup or honey is always welcome.
For added protein and healthy fats, a dollop of Greek yogurt or a swirl of nut butter (peanut butter, almond butter, cashew butter) transforms these into an even more satisfying meal. Chopped nuts, shredded coconut, or a sprinkle of chocolate chips also make for delightful additions. Don’t be afraid to experiment and find your perfect combination!

Crafting Your High-Protein Breakfast Bowls
The beauty of these baked protein pancake bowls lies in their straightforward preparation. You’ll be amazed at how quickly you can whip up the batter and get it into the oven. Just a few simple steps stand between you and a wonderfully satisfying breakfast.
Prep Your Oven & Bowls
First things first, preheat your oven to 375°F (190°C). Then, lightly grease two oven-safe bowls or ramekins. I prefer using ceramic soup bowls or small gratin dishes – anything that holds about 1.5 to 2 cups. A little spray of cooking oil or a dab of butter ensures your pancake bowls will slide out easily, though I often just eat them right in the bowl!
Whisk the Dry Ingredients
In a medium mixing bowl, combine your flour, protein powder, baking powder, baking soda, and salt. Give them a good whisk to ensure everything is evenly distributed. This step is important for preventing pockets of leavening agent and making sure your high-protein pancakes rise uniformly.
Combine the Wet Ingredients
In a separate, smaller bowl, whisk together the milk, egg, melted sweetener (if using maple syrup or honey), and vanilla extract. Make sure the egg is fully incorporated.
Bring it All Together
Pour the wet ingredients into the dry ingredients. Stir gently with a spoon or spatula until just combined. A few lumps are perfectly normal and actually desirable – overmixing leads to tough pancakes. Stop stirring as soon as you don’t see any streaks of dry flour.
Tip: If your protein powder tends to clump, you can whisk it into the wet ingredients first until smooth before adding to the dry. This helps ensure a silky batter.
Bake to Fluffy Perfection
Divide the batter evenly between your two prepared bowls. Place the bowls on a baking sheet (this makes them easier to transfer in and out of the oven, and catches any spills). Bake for 18-25 minutes, or until the tops are golden brown and a toothpick inserted into the center comes out clean. They’ll puff up beautifully in the oven!
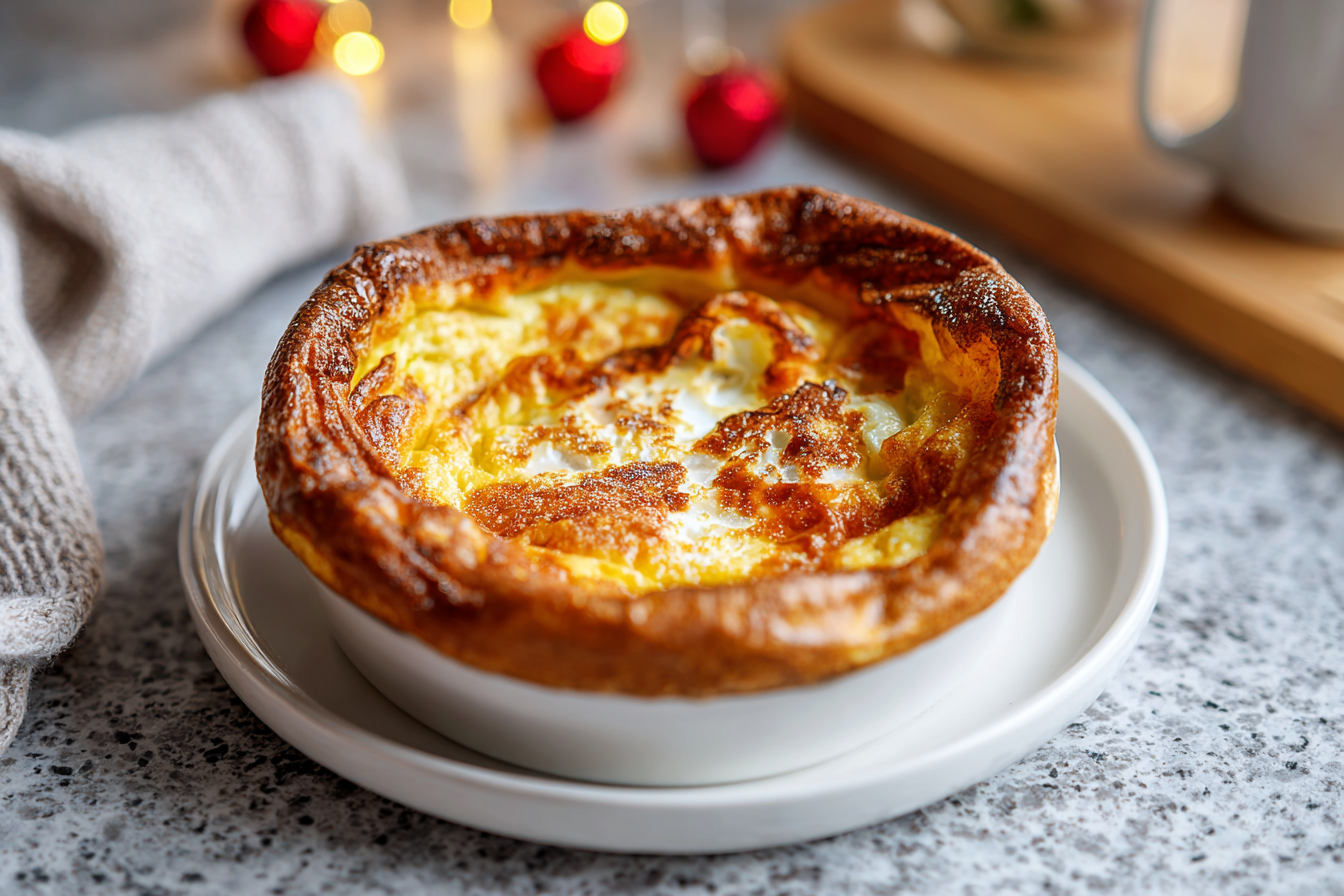
Serving and Savoring Your Protein-Packed Treat
Once your baked protein pancake bowls emerge from the oven, golden and fragrant, the best part begins! They’ll be wonderfully puffed up, but will settle slightly as they cool, which is completely normal. Let them cool for just a minute or two before adding your favorite toppings.
I love to pile on fresh berries – a handful of blueberries and some sliced strawberries add a vibrant burst of color and natural sweetness. A drizzle of pure maple syrup is always a classic, but for an extra protein boost, a spoonful of Greek yogurt or cottage cheese is fantastic. A sprinkle of chopped nuts or a swirl of almond butter provides healthy fats and a satisfying crunch.
These are best enjoyed warm, straight from the oven. The soft, fluffy texture and warm interior are truly comforting. They make for a perfect cozy weekend breakfast or a quick, nutritious meal during the week. Don’t forget that cup of coffee!
Meal Prep and Storage Made Easy
One of the biggest perks of these baked protein pancake bowls is how well they lend themselves to meal prepping. Making a batch on Sunday means you have delicious, healthy breakfasts ready to go for several days, simplifying your busy mornings considerably.
Make-Ahead & Refrigeration
Once baked, allow the pancake bowls to cool completely before storing. You can either store them right in their baking dishes (if they have lids) or transfer them to airtight containers. They’ll keep beautifully in the refrigerator for up to 3-4 days. This makes them perfect for grab-and-go breakfasts throughout the week.
Reheating Magic
To reheat, simply pop a bowl into the microwave for 30-60 seconds, or until warmed through. You can also warm them gently in a preheated oven (around 300°F/150°C) for 5-10 minutes if you prefer them crispy on top, though this is less common for a quick weekday reheat. Add your fresh toppings after reheating for the best texture.
Freezing for Later
Yes, you can freeze these! Once completely cooled, wrap individual pancake bowls tightly in plastic wrap, then aluminum foil, or place them in freezer-safe bags or containers. They’ll stay fresh in the freezer for up to 1-2 months. When you’re ready to enjoy, thaw them overnight in the refrigerator and then reheat as usual, or reheat directly from frozen in the microwave (it might take 1-2 minutes longer).
Common Questions About These Baked Pancakes
Can I make these gluten-free?
Absolutely! I’ve had great success using a 1:1 gluten-free all-purpose flour blend in this recipe. Just ensure your chosen blend contains xanthan gum, or add 1/4 teaspoon per cup of flour if it doesn’t, for best results. The texture will still be wonderfully fluffy.
What’s the best protein powder to use?
Whey protein isolate or a good quality whey blend tends to work best for texture. If using a plant-based protein, I recommend a finely milled pea or rice protein blend, as some can make baked goods a bit denser or chalky. Vanilla or unflavored options are most versatile.
Can I make these dairy-free?
Yes, easily! Simply swap regular milk for your favorite non-dairy milk like almond, oat, or soy milk. If you want the tang of buttermilk, add 1 teaspoon of apple cider vinegar or lemon juice to your non-dairy milk and let it sit for 5 minutes before using.
How can I make these sweeter or less sweet?
You can adjust the amount of sweetener (maple syrup, honey, or sugar substitute) in the batter to suit your taste. For more sweetness, you can also rely on your toppings – extra maple syrup, fresh fruit, or a sprinkle of powdered sugar after baking.
My pancakes didn’t rise much, what did I do wrong?
The most common culprits are old or expired baking powder/soda, or overmixing the batter. Always check the freshness of your leavening agents. Also, truly mix until just combined; a lumpy batter is a happy batter for pancakes!

Fluffy Baked Protein Pancake Bowls
Easy, high-protein baked pancake bowls. Fluffy, sweet, and perfect for healthy meal prep or a cozy breakfast.
📝 Ingredients
👩🍳 Instructions
-
1Preheat your oven to 375°F (190°C). Lightly grease two oven-safe bowls or ramekins (about 1.5-2 cup capacity each).
-
2In a medium mixing bowl, whisk together the flour, protein powder, sugar, baking powder, baking soda, and salt until well combined.
-
3In a separate small bowl, whisk the egg, milk, melted butter (or oil), and vanilla extract until smooth.
-
4Pour the wet ingredients into the dry ingredients. Stir gently with a spoon or spatula until just combined. A few lumps are okay; avoid overmixing.
-
5Divide the batter evenly between the two prepared bowls. Place the bowls on a baking sheet for easier handling.
-
6Bake for 18-25 minutes, or until the tops are golden brown and a toothpick inserted into the center comes out clean. They will puff up significantly.
-
7Remove from the oven and let cool for a minute or two. Top with your favorite additions like fresh berries, a drizzle of maple syrup, Greek yogurt, or nut butter. Serve warm.
💡 Notes
For dairy-free, use non-dairy milk and coconut oil. For a buttermilk tang, add 1 tsp of lemon juice or apple cider vinegar to your milk and let sit 5 minutes before combining. Store cooled leftovers in an airtight container in the fridge for up to 3-4 days. Reheat in the microwave for 30-60 seconds.


