I once tried to make granola bars, and let’s just say the result was less “bar” and more “crumbly, sticky mess you eat with a spoon.” It was disheartening, to say the least, but it taught me a valuable lesson about the delicate balance required for a truly good, sturdy, yet tender snack. That’s why these wholesome berry and oat bars are such a triumph in my kitchen; they hold together beautifully, taste incredible, and are packed with all the good stuff you want in a healthy snack.
- Why These Berry & Oat Bars Will Become a Pantry Staple
- Gather Your Goodies: Ingredients for Your Berry Oat Bars
- Crafting Your Bars: Step-by-Step Guide
- Prepping Your Pan & Oven
- Whipping Up the Oat Crumb Base
- Pressing the First Layer
- Making the Berry Burst Filling
- Assembling the Layers
- Baking to Golden Perfection
- The Cool-Down Crucial Step
- Slicing and Serving
- Pro Tips for Perfect Oat Bars Every Time
- Frequently Asked Questions About Your Berry Oat Bars
- Can I use frozen berries instead of fresh?
- What if I don’t have whole wheat flour?
- How long do these berry and oat bars last?
- Can I make these gluten-free?
- Can I reduce the sugar in the recipe?
- Storage & Freezing Suggestions
- Variations to Keep Things Exciting
My go-to for breakfast or that 3 PM slump used to be whatever I could snatch from the pantry. More often than not, it wasn’t the most nutritious choice. Discovering the magic of homemade oat bars changed everything for me. These aren’t your average bland health food; they burst with the natural sweetness of berries and have a wonderfully satisfying chew thanks to the oats.
Whether you’re packing lunches, fueling up before a workout, or just need a mindful moment with a cup of tea, these berry and oat bars are a fantastic solution. They’re simple to whip up, store well, and honestly, they just make you feel good from the inside out.

Why These Berry & Oat Bars Will Become a Pantry Staple
Forget those overly sweet, mystery-ingredient snack bars from the grocery store. This recipe for berry and oat bars is a game-changer because you control exactly what goes in. We’re talking real fruit, hearty oats, and just enough natural sweetener to make them utterly delicious without the sugar crash.
What sets these apart is their perfect texture: soft and chewy, yet firm enough to hold their shape, even when you’re eating them on the go. There’s no crumbling, no mess, just pure, wholesome goodness in every bite. They’re also incredibly versatile, allowing for endless customization to suit your taste or whatever fruit you have on hand.
Making your own snacks is also a fantastic way to save money and reduce food waste. You can use up those berries that are just on the edge, and you’ll always have a healthy option readily available. Trust me, once you make a batch of these, you’ll wonder how you ever lived without them.
Gather Your Goodies: Ingredients for Your Berry Oat Bars
The beauty of these bars lies in their simple, wholesome components. You likely have most of these in your pantry already! We’re focusing on fresh, vibrant flavors and satisfying textures.
For the Oat Base
- Rolled Oats: Old-fashioned oats are key here for that perfect chewy texture. Quick oats can work in a pinch but might result in a softer bar.
- Whole Wheat Flour: Adds structure and a touch more fiber. All-purpose flour is fine too if that’s what you have.
- Light Brown Sugar: For a warm, caramel-like sweetness. You can adjust this to your preference.
- Cinnamon: A touch of spice that pairs wonderfully with berries.
- Salt: Just a pinch to balance and enhance all the flavors.
- Unsalted Butter, Melted: Binds everything together and adds richness. Coconut oil can be a great dairy-free alternative.
- Vanilla Extract: A classic flavor enhancer that brings out the best in the oats and berries.
For the Berry Filling
- Mixed Berries: Fresh or frozen work equally well! Think strawberries, blueberries, raspberries, or a combination. If using frozen, don’t thaw them first.
- Granulated Sugar: A touch to sweeten the berries and create a jam-like consistency.
- Cornstarch: This is our secret weapon for a thick, luscious berry filling that won’t make your bars soggy.
- Lemon Juice: Brightens the berry flavor and adds a lovely tang.

Crafting Your Bars: Step-by-Step Guide
This recipe is straightforward, but a little patience goes a long way. Take your time, enjoy the process, and soon you’ll have a batch of delicious berry and oat bars ready to go.
Prepping Your Pan & Oven
First things first, preheat your oven to 375°F (190°C). Line an 8×8 inch baking pan with parchment paper, leaving an overhang on two sides. This makes lifting the finished bars out incredibly easy. A little spray of cooking oil under the parchment helps it stick in place.
Whipping Up the Oat Crumb Base
In a large mixing bowl, combine your rolled oats, whole wheat flour, light brown sugar, cinnamon, and salt. Give it a good whisk to ensure everything is evenly distributed. Now, pour in the melted butter and vanilla extract.
Stir everything together with a fork or your hands until well combined and crumbly. It should resemble wet sand, clumping together when you press it. This is your foundation!
Pressing the First Layer
Take about two-thirds of the oat mixture and press it firmly and evenly into the bottom of your prepared baking pan. Use the back of a spoon, your fingers, or even a flat-bottomed glass to get a compact, uniform layer. This prevents the berry filling from seeping through.
Tip: For an extra sturdy base, you can pop this layer into the oven to pre-bake for about 10 minutes while you prepare the berry filling. This helps create a crispier bottom layer.
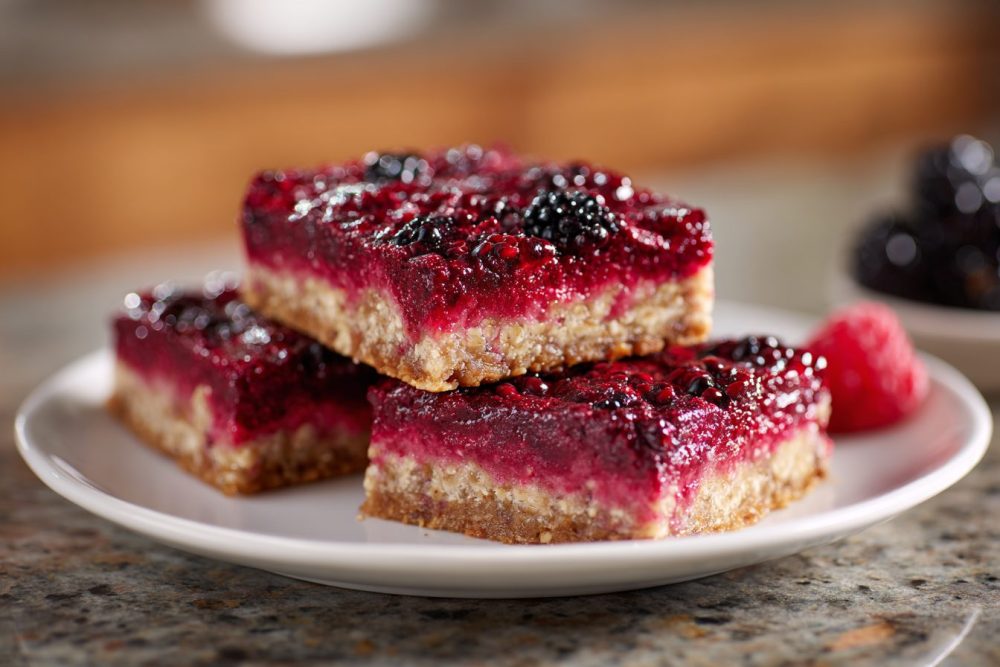
Making the Berry Burst Filling
In a separate medium bowl, gently toss your berries (fresh or frozen) with granulated sugar, cornstarch, and lemon juice. The cornstarch will thicken the juices released by the berries during baking, preventing a watery mess. Don’t overmix; just ensure the berries are coated.
Assembling the Layers
Carefully spoon the berry mixture over the pressed oat base in the pan, spreading it out evenly to the edges. Now, take the remaining one-third of the oat mixture and crumble it over the berry layer. Don’t press this top layer down; you want it to remain loose and crumbly for that classic bar topping texture.
Baking to Golden Perfection
Place your pan into the preheated oven and bake for 35-40 minutes. You’re looking for the top to be golden brown and the berry filling to be bubbly around the edges. The aroma filling your kitchen will be incredible!
The Cool-Down Crucial Step
This is arguably the most important step for perfectly structured bars. Once baked, remove the pan from the oven and let it cool completely on a wire rack. I mean *completely* – this can take 2-3 hours, or even longer. Resisting the urge to cut into them warm is tough, but it allows the bars to set properly. Warm bars will fall apart.
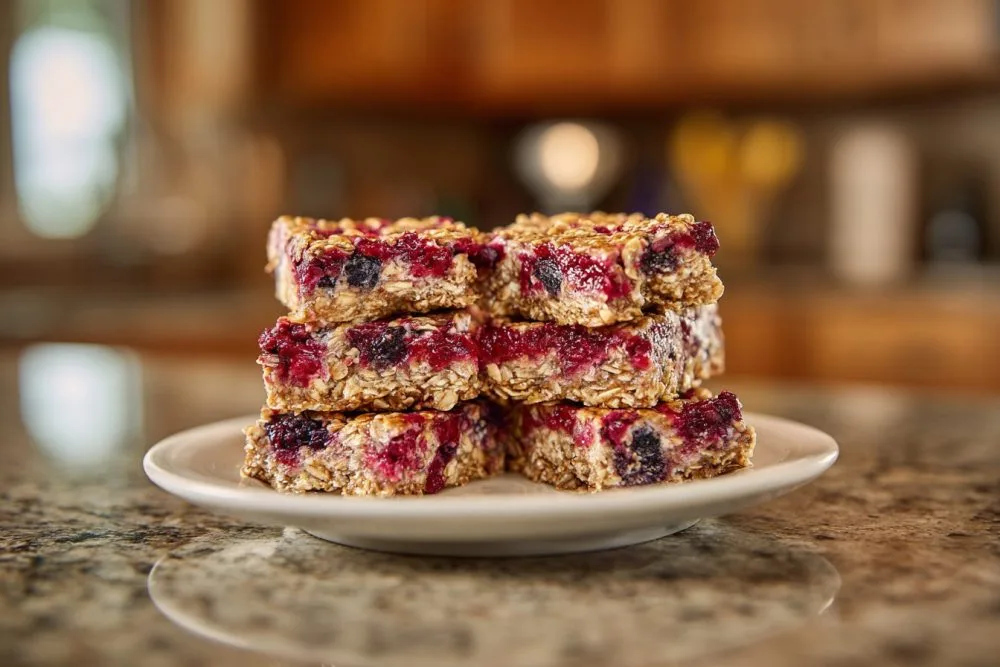
Slicing and Serving
Once fully cooled, use the parchment paper overhang to lift the entire slab out of the pan onto a cutting board. Use a sharp knife to cut into 12-16 bars, depending on your preferred size. Now, finally, you can enjoy the fruits (and oats!) of your labor!
Pro Tips for Perfect Oat Bars Every Time
Even though these are fairly simple, a few small tweaks can elevate your berry and oat bars from good to absolutely fantastic. I’ve learned these through plenty of kitchen experiments!
The Power of Chilled Butter
While the recipe calls for melted butter in the base, if you want a slightly more tender, flakier crumble, try using very cold, cubed butter and cut it into the dry ingredients with a pastry blender or your fingertips until pea-sized crumbs form. Then, melt a tablespoon or two more and mix it in just until it comes together. This creates pockets of butter that steam and expand, leading to a more textured crust.
Don’t Skimp on the Cool-Down
Seriously, I can’t stress this enough. The starches in the oats and the cornstarch in the berries need time to fully set as they cool. Cutting them warm is like trying to build a sandcastle without water – it just won’t hold. If you’re short on time, let them cool on the counter for an hour, then pop them into the fridge for another hour or so to speed things up.
Flavor Boosters & Add-ins
Want to amp up the flavor? A sprinkle of lemon zest in the oat mixture or a dash of almond extract in the berry filling can add wonderful complexity. A handful of chopped nuts (pecans or walnuts) mixed into the oat topping before baking can also provide a delightful crunch. For an extra touch of sweetness and richness, a drizzle of white chocolate or a thin glaze made from powdered sugar and lemon juice can be added once the bars are completely cool.
Frequently Asked Questions About Your Berry Oat Bars
I get a lot of questions about making snack bars, so I’ve compiled some common queries and their answers to help you troubleshoot or customize your batch.
Can I use frozen berries instead of fresh?
Absolutely! Frozen berries work wonderfully in this recipe. There’s no need to thaw them beforehand; just toss them directly with the sugar, cornstarch, and lemon juice. They might release a little more liquid initially, but the cornstarch will handle it beautifully.
What if I don’t have whole wheat flour?
No problem at all! You can easily substitute all-purpose flour for the whole wheat flour. The bars will still be delicious, though with a slightly less robust, nutty flavor profile. Almond flour could also work for a gluten-free option, but you might need to adjust the amount slightly as it absorbs liquid differently.
How long do these berry and oat bars last?
Stored in an airtight container at room temperature, these bars will stay fresh for up to 3-4 days. If you want them to last longer, you can pop them in the refrigerator for up to a week. They also freeze exceptionally well!
Can I make these gluten-free?
Yes! Simply ensure you use certified gluten-free rolled oats and substitute the whole wheat flour with an equal amount of a gluten-free all-purpose flour blend (one that contains xanthan gum is best for structure) or a combination of almond and oat flour. Always check ingredient labels for cross-contamination if gluten sensitivity is a concern.
Can I reduce the sugar in the recipe?
You certainly can! The amount of sugar is somewhat flexible based on the sweetness of your berries and your personal preference. You can try reducing the sugar in both the oat base and the berry filling by about 1/4 to 1/3 cup each. Keep in mind that sugar also contributes to the texture and browning, so significant reductions might alter the final result slightly. Maple syrup or honey could also be used in the oat base, but the consistency might be a little different.
Storage & Freezing Suggestions
One of the best things about these wholesome berry and oat bars is how well they store, making them perfect for meal prep or having a healthy snack on hand whenever hunger strikes.
Short-Term Storage
Once completely cooled and cut, stack your bars between layers of parchment paper in an airtight container. They’ll keep beautifully on your counter at room temperature for 3-4 days. For extended freshness, especially in warmer climates, keeping them in the refrigerator is a good idea; they’ll last about a week there. Just be aware that refrigeration can make the top crumble a little firmer, but it’s still delicious.
Long-Term (Freezer) Storage
These bars are excellent for freezing! Wrap individual bars tightly in plastic wrap, then place them in a freezer-safe bag or container. They’ll hold up well in the freezer for up to 2-3 months. To enjoy, simply pull one out and let it thaw at room temperature for about 30-60 minutes, or microwave for 15-30 seconds if you’re in a hurry. They taste just as good as fresh!
Variations to Keep Things Exciting
While the classic berry and oat combination is undeniably delicious, don’t be afraid to experiment! These bars are a fantastic canvas for other flavors and ingredients.
Fruit Swaps
Instead of mixed berries, try a single fruit like sliced peaches, diced apples (sautéed slightly first to soften), or even chopped rhubarb. A combination of mango and passionfruit could be wonderfully tropical. Just remember to adjust the cornstarch if using very watery fruits, and perhaps a little more sugar if using tart ones like rhubarb.
Nutty Additions
Stir in a handful of chopped nuts like almonds, walnuts, or pecans into the oat topping for an extra layer of crunch and healthy fats. Toasted coconut flakes also make a delightful addition, especially if you’re leaning into a more tropical fruit filling.
Chocolate Lover’s Delight
For those with a sweet tooth, sprinkle some mini chocolate chips (dark, milk, or white!) over the berry filling before adding the top oat layer. The chocolate will melt into the berries, creating little pockets of gooey deliciousness. You can also drizzle melted chocolate over the cooled bars.
Spice It Up
Beyond cinnamon, consider adding a pinch of nutmeg, cardamom, or even a tiny bit of ginger to the oat base for a different aromatic profile. These spices can really complement certain fruits, like apple or pear.
No matter how you customize them, these berry and oat bars are destined to become a beloved recipe in your kitchen. They’re a testament to how easy and rewarding it can be to make healthy, satisfying snacks from scratch. Happy baking!

Wholesome Berry & Oat Bars
Delicious, easy-to-make berry and oat bars packed with fresh fruit and wholesome oats for a perfect healthy snack or breakfast.
📝 Ingredients
👩🍳 Instructions
-
1Preheat your oven to 375°F (190°C). Line an 8x8 inch baking pan with parchment paper, leaving an overhang on two sides.
-
2In a large bowl, combine the rolled oats, whole wheat flour, brown sugar, cinnamon, and salt. Whisk until well mixed.
-
3Pour the melted butter and vanilla extract into the oat mixture. Stir with a fork or your hands until a crumbly mixture forms.
-
4Press about two-thirds of the oat mixture firmly and evenly into the bottom of the prepared baking pan to form the base.
-
5In a separate medium bowl, gently toss the mixed berries with granulated sugar, cornstarch, and lemon juice until the berries are coated.
-
6Spoon the berry mixture evenly over the pressed oat base in the pan.
-
7Crumble the remaining one-third of the oat mixture over the berry layer.
-
8Bake for 35-40 minutes, or until the topping is golden brown and the berry filling is bubbly.
-
9Remove the pan from the oven and let the bars cool completely on a wire rack for at least 2-3 hours before cutting. This is crucial for them to set properly.
-
10Once cooled, use the parchment paper overhang to lift the bars out of the pan. Cut into 12-16 squares or rectangles using a sharp knife.
💡 Notes
For a gluten-free version, use certified gluten-free oats and a gluten-free all-purpose flour blend. Feel free to swap mixed berries for other fruits like peaches or apples. Store in an airtight container at room temperature for up to 4 days, or refrigerate for up to a week. These bars also freeze well for up to 3 months.